Blog
The Laptopkey.eu blog is a place for people looking for advice and information on laptop keyboard repair. We sell individual keys, hinges, and cups, allowing for quick and economical repairs without the need to replace the entire keyboard.

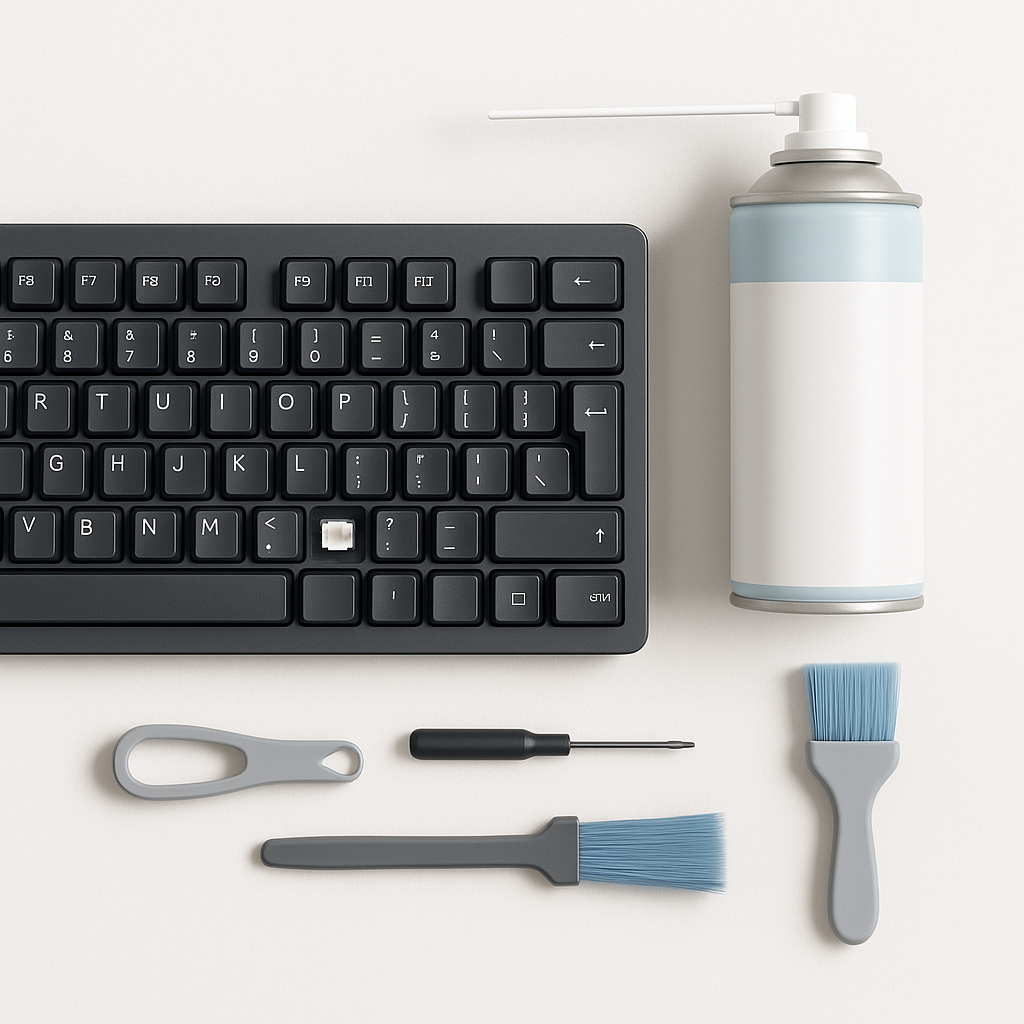
Table of Contents:
- Key Takeaways
- Understanding the Causes of Keyboard Key Issues
- Identifying Physical Damages and Wear
- Common Mechanical and Software Problems
- Simple Steps: How to Fix a Keyboard Key
- Essential Tools and Supplies for Repair
- Keycap Pullers, Screwdrivers, and Cleaning Agents
- Replacement Parts for Damaged Keys
- Detailed Repair Procedures: Step-by-Step Guide
- Removing and Cleaning the Key
- Reattaching or Replacing the Key
- Fixing Sticky or Unresponsive Keys
- Addressing Connection and Firmware Problems
- Preventive Maintenance for Long-Lasting Performance
- Regular Cleaning and Lubrication Techniques
- Alternative Solutions and Advanced Repair Options
- Specialised Approaches for Unique Keyboard Models
Dealing with unresponsive or damaged keys can disrupt productivity and frustrate even the most patient users. This comprehensive resource simplifies the process of diagnosing and resolving common issues across various keyboard types, from budget-friendly models to premium mechanical designs.
Understanding basic repair principles helps extend your device’s lifespan while avoiding costly professional services. Most problems stem from debris accumulation, worn components, or minor physical damage – all addressable with methodical troubleshooting and basic tools.
Modern peripherals share universal repair fundamentals despite differing constructions. Effective solutions typically involve sequential stages: identifying fault patterns, preparing appropriate implements, executing careful disassembly, and implementing targeted cleaning or part replacements. Regular maintenance significantly reduces recurrence risks.
Whether confronting sticky mechanisms, erratic inputs, or complete key failure, this guide provides actionable strategies. Learn to distinguish between software glitches and hardware faults while developing sustainable care habits for your equipment.
Key Takeaways
- DIY repairs prioritise cost-efficiency over replacement
- Universal techniques apply across keyboard designs
- Systematic diagnosis prevents unnecessary disassembly
- Essential maintenance practises minimise future issues
- Most key malfunctions stem from preventable causes
Understanding the Causes of Keyboard Key Issues
Keyboard malfunctions often stem from identifiable sources that affect performance and longevity. Recognising these root reasons helps users address issues efficiently while preventing recurring complications.
Identifying Physical Damages and Wear
Cracked keycaps and bent stabilisers frequently occur from accidental impacts or rough handling. Heavy usage patterns erode switch contacts, particularly on spacebars and letter keys, creating inconsistent responses. Spilled liquids leave sticky residues that hinder movement, while dust particles gradually accumulate beneath caps.
Common Mechanical and Software Problems
Newer keyboards occasionally exhibit manufacturing flaws like misaligned switches or defective stabiliser clips. Older models suffer from oxidised contacts or degraded rubber domes in membrane designs. Software glitches – outdated drivers or incorrect regional settings – often mimic hardware faults, causing erratic behaviour.
Environmental factors play a significant role in device deterioration. Pet hair and food crumbs restrict key travel, while temperature fluctuations accelerate material wear. Regular inspection helps distinguish between physical damage and temporary obstructions requiring simple cleaning.
Simple Steps: How to Fix a Keyboard Key
Effective troubleshooting combines systematic inspection with precise adjustments. Before attempting repairs, gather necessary implements: compressed air, isopropyl alcohol, and plastic pry tools. Always work on a clean, static-free surface to prevent component damage.
Examining the Key Mechanism
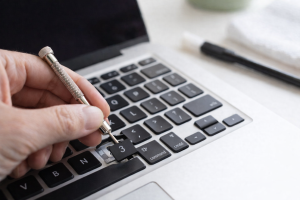
Disconnect the device and remove the affected keycap using gentle upward pressure. Inspect the switch housing for debris accumulation or bent components. Look for cracked stems or worn stabiliser clips beneath the keycap.
Test the actuator’s responsiveness by pressing the exposed mechanism directly. Compare its tactile feedback with neighbouring switches. Proper alignment between keycap and stabiliser bars ensures smooth vertical movement.
Problem Observed - Key wobbles when pressed, No tactile feedback, Sticky movement
Potential Cause - Damaged stabiliser bars, Switch mechanism failure, Residue accumulation
Recommended Action - Replace stabiliser assembly, Install replacement switch, Clean with isopropyl solution
Assessing the Key's Functionality After Reattachment
Reinstall the keycap, ensuring perfect alignment with surrounding buttons. Conduct multiple input tests across different applications. If inputs remain unregistered, examine the membrane layer for wear in membrane-based designs.
For mechanical switches, verify solder connections on printed circuit boards. Persistent issues often indicate component replacement needs rather than simple cleaning requirements. Document any irregular response patterns for future reference.
Essential Tools and Supplies for Repair
Successful repairs begin with proper preparation. Assembling the correct implements ensures efficient troubleshooting while safeguarding delicate components. Specialised equipment ranges from basic cleaning kits to precision disassembly tools.
Keycap Pullers, Screwdrivers, and Cleaning Agents
Wire-style keycap pullers prevent stem damage during removal. Plastic variants work well for standard keys, while wide-grip designs suit spacebars. Precision screwdrivers with magnetic tips handle Torx and Phillips heads common in modern devices.
Compressed air removes loose debris from switch housings. Isopropyl alcohol (70-99%) dissolves sticky residues without harming electronics. Combine with cotton swabs for detailed cleaning of stabiliser rails.
Tool - Keycap puller, Torx T6 screwdriver, Air duster
Purpose - Safe key removal, Opening chassis, Debris clearance
Usage Tip - Angle at 45° when lifting, Use anti-static mat, Hold can upright
Replacement Parts for Damaged Keys
Persistent issues often require component swaps. Laptopkey.eu supplies individual keys, retainer clips, and trackpoints for various devices. Their inventory covers laptops, tablets, and wireless models.
Keep spare switches and stabilisers for mechanical designs. Membrane keyboards need replacement rubber domes. Store small parts in magnetic trays during repairs to prevent loss.
Replacement keycaps should match original stem types. Measure stabiliser spacing before ordering. Third-party suppliers offer cost-effective alternatives to OEM parts.
Detailed Repair Procedures: Step-by-Step Guide
Restoring full functionality requires precision and a methodical approach. This walkthrough prioritises safe disassembly techniques while addressing common contamination sources affecting responsiveness.
Removing and Cleaning the Key
Position a wire keycap puller around the affected key at 45 degrees. Apply steady upward pressure until the cap releases. Photograph the layout before proceeding to simplify reassembly.
Submerge a cotton swab in isopropyl alcohol diluted with water. Scrub the keycap’s underside, focusing on stem connectors and textured surfaces where grime collects. For mechanical switches, use compressed air to dislodge debris from the housing.
Address stubborn dirt around stabilisers with a soft-bristled brush. Apply a small amount of cleaning solution to problem areas. Avoid oversaturating the switch mechanism to prevent liquid ingress.
Reattaching or Replacing the Key
Ensure components are completely dry before reassembly. Align the keycap’s stem with the switch post, pressing evenly until securing clicks occur. Test travel distance and input registration immediately.
Persistent issues may necessitate part replacements. Compare replacement keycaps with originals for stem compatibility. Mechanical users might apply switch-specific lubricant during reassembly for smoother operation.
Component - Keycap, Switch housing, Stabilisers
Cleaning Method - Alcohol swab, Compressed air, Brush & solution
Drying Time - 5 minutes, Instant,15 minutes
Troubleshooting Common Keyboard Issues
Persistent input problems demand structured approaches to isolate root causes. Whether facing erratic responses or total failure, targeted solutions exist for both mechanical and digital complications.
Fixing Sticky or Unresponsive Keys
Slow-acting buttons often harbour debris beneath caps. Use compressed air to dislodge particles before applying isopropyl alcohol with cotton swabs. For membrane designs, inspect rubber domes for permanent indentations affecting typing accuracy.
Mechanical switches benefit from lubrication after cleaning. Check stabiliser bars for warping if keys wobble during use. Always test responsiveness before reassembling components.
Addressing Connection and Firmware Problems
Wireless models suffering dropouts require proximity checks between receivers and devices. Update Bluetooth drivers through Windows Device Manager if pairing fails. Wired versions may need USB port testing across multiple computer sockets.
Unexpected character outputs often stem from incorrect regional settings. Navigate to Language Preferences to verify layout matches physical keys. Modern peripherals with programmable features might need firmware reinstalls via manufacturer software.
Problem Type - Delayed responses, Ghost inputs, Inconsistent backlight
Diagnostic Step - Check for liquid damage, Monitor wireless interference, Review power settings
Resolution - Replace affected circuits, Switch connection bands, Adjust sleep timers
Function lock modes occasionally disable specific buttons unintentionally. Consult device manuals to reset these features. For persistent issues, systematic elimination of variables yields reliable solutions without unnecessary part replacements.
Preventive Maintenance for Long-Lasting Performance
Proactive care extends your device’s lifespan while preserving typing accuracy. Establishing consistent routines prevents common contamination issues before they escalate into performance problems.
Regular Cleaning and Lubrication Techniques
Weekly wipe-downs with microfiber cloths remove surface dust. Monthly deep cleans tackle crumbs lodged between keys. Use compressed air angled at 45° to blast debris from switch housings without forcing particles deeper.
Mechanical models benefit from quarterly lubrication. Apply thin layers of switch-specific grease to contact points. Over-application causes sluggish movement – a toothpick dab ensures precision. Always test responsiveness post-treatment.
1.Maintenance Task
2.Frequency
3.Tool Required
1.Surface cleaning
2.Weekly
3.Microfibre cloth
1.Switch lubrication
2.Quarterly
3.Grease applicator
1.Stabiliser checks
2.Bi-monthly
3.Plastic pry tool
Store portable devices in padded cases during transport. Avoid snacking near equipment – oils and crumbs accelerate wear. Document cleaning dates to identify optimal service intervals.
Environmental factors significantly impact durability. Keep devices away from direct sunlight and humidity extremes. These precautions preserve plastic components and prevent warping.
Alternative Solutions and Advanced Repair Options
When standard cleaning and part swaps prove insufficient, specialised strategies restore functionality across diverse devices. Unique mechanical layouts and proprietary designs demand tailored approaches that respect manufacturer specifications while addressing core issues.
Specialised Approaches for Unique Keyboard Models
Low-profile laptop models often require specific removal tools for scissor-switch mechanisms. Gaming peripherals with RGB lighting need careful disconnection of LED wiring during replacement procedures. Always consult technical schematics for uncommon switch types like optical or Hall-effect designs.
Vintage mechanical models benefit from ultrasonic cleaning rather than manual methods. Some membrane-based devices demand full assembly replacements when individual domes degrade. Third-party replacement parts must match original dimensions for proper stabiliser alignment.
For complex keyboard issues, professional services offer solder reflowing or PCB trace repairs. Explore modular options for ergonomic split designs where standard solutions falter. Prioritise OEM components when available to ensure compatibility with niche models.