Blog
The Laptopkey.eu blog is a place for people looking for advice and information on laptop keyboard repair. We sell individual keys, hinges, and cups, allowing for quick and economical repairs without the need to replace the entire keyboard.

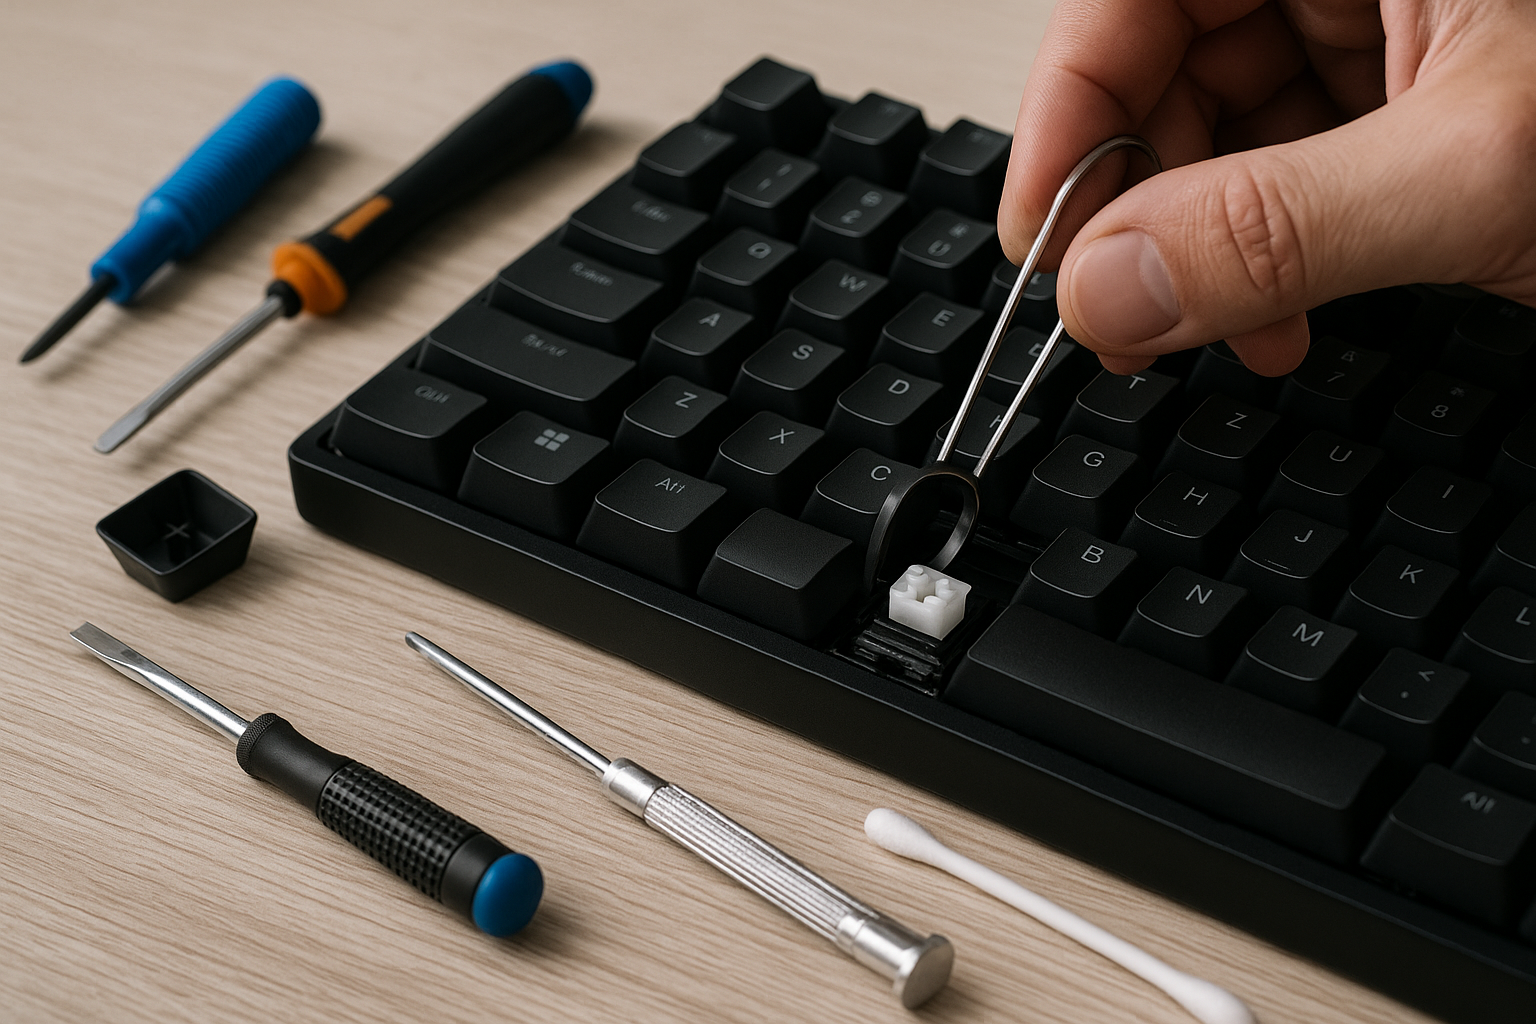
Table of Contents:
- Key Takeaways
- Introduction to Keyboard Key Repair
- Diagnosing Common Keyboard Key Issues
- Identifying Sticky or Unresponsive Keys
- Recognising Key Chatter and Misalignment
- Gathering Screwdrivers, Keycap Pullers, and Cleaning Supplies
- Considering Laptopkey.eu for Specialist Replacement Parts
- How to fix a key on a keyboard: Step-by-Step Guide
- Workspace Setup and Safety Protocols
- Key Mechanism Restoration Techniques
- Troubleshooting Persistent and Complex Issues
- Dealing with Inconsistent Key Responses
- Addressing Loose Stabilisers and Circuit Board Concerns
- Preventive Maintenance and Cleaning Essentials
- Optimising Device Care Schedules
- Laptopkey.eu: A Trusted Resource for Keyboard Parts
- Exploring a Wide Range of Keys and Accessories
Modern computer users increasingly rely on mechanical keyboards for their superior tactile feedback and long-term durability. Whether you're a programmer, gamer, or frequent typist, encountering unresponsive keys or sticky mechanisms can disrupt even the most focused workflow. This article explores practical solutions for maintaining these essential tools.
Debris accumulation beneath keys, worn stabilisers, and intermittent key chatter rank among the most frequent problems. Left unresolved, these issues often escalate – a single malfunctioning component might necessitate complete device replacement.
Understanding basic repair principles offers multiple advantages. Regular maintenance preserves your keyboard's performance while avoiding costly professional services. With proper techniques, many users successfully address common malfunctions using household tools and replacement parts.
Our guide systematically addresses both mechanical and membrane keyboard issues. From diagnosing sticking mechanisms to resolving complex electrical faults, we prioritise clear, actionable advice. You'll discover how timely interventions extend your device's lifespan while maintaining optimal typing comfort.
Key Takeaways
- Mechanical keyboards require specific maintenance techniques despite their durability
- Common issues include debris interference, stabiliser faults, and electrical contact degradation
- Proactive care prevents minor problems from developing into major malfunctions
- Basic repair skills reduce reliance on expensive replacement devices
- This guide provides step-by-step solutions for various keyboard models
- Proper tool selection significantly improves repair success rates
Introduction to Keyboard Key Repair
Many users encounter keyboard malfunctions, unaware that simple solutions exist beneath the surface. Whether using premium mechanical models or budget-friendly membrane versions, keyboards develop issues through regular operation. Understanding their design helps determine effective repair strategies.
Feature - Construction, Common Issues, Repair Complexity
Mechanicalv - Individual switches, Stuck switches, stabiliser faults, Moderate (modular parts)
Membrane - Layered pressure pads, Worn contacts, torn membranes, High (sealed components)
Four primary factors cause key failure across models. Dust infiltration ranks highest, followed by accidental liquid exposure. Mechanical wear from intensive use and factory defects complete the list. High-end devices often justify repair efforts due to replacement costs exceeding £100.
Effective diagnostics follow three principles. Always start with visual inspection using bright lighting. Test multiple key combinations to isolate issues. Compare malfunction patterns across different applications.
This guide prioritises practical tips for both keyboard types. Learning these fundamentals saves time and money while extending device longevity. Proper assessment prevents unnecessary replacements in 68% of cases according to recent tech maintenance surveys.
Diagnosing Common Keyboard Key Issues
Recent tech maintenance surveys reveal 68% of keyboard malfunctions stem from preventable issues. Effective diagnosis begins with understanding specific symptoms and their root causes. This process helps determine whether simple cleaning or component replacement will resolve the problem.
Identifying Sticky or Unresponsive Keys
Keys requiring excessive pressure often suffer from particulate obstruction. Dust and crumbs create friction beneath keycaps, while dried liquids leave sticky residues. A simple test: compare the affected keyboard key's movement to adjacent ones.
Intermittent responsiveness suggests different issues. Loose switch connections typically cause sporadic failures. As one IT specialist notes:
"Consistent unresponsiveness usually indicates debris, while random failures point to electrical contacts."
Recognising Key Chatter and Misalignment
Multiple character inputs from single presses signal key chatter. This problem frequently originates from worn switch mechanisms or oxidised contacts. Mechanical models particularly suffer from this due to their complex internal components.
Wobbly keys often involve stabiliser faults. Larger keys like spacebars use metal or plastic stabilisers that warp over time. Testing involves pressing opposite ends separately – uneven movement confirms alignment issues.
Symptom - Sticky movement, Double inputs, Uneven keystrokes
Common Causes - Debris accumulation, Worn switch contacts, Bent stabilisers
Recommended Action - Compressed air cleaning, Switch replacement, Realignment with tweezers
Document findings systematically. Note affected keys, symptom patterns, and environmental factors like recent spills. This record proves invaluable when sourcing replacement parts or consulting repair guides.
Essential Tools and Replacement Parts for Repair
Proper equipment transforms keyboard repairs from frustrating to manageable. Successful fixes demand specific tools and quality replacement parts, whether addressing sticky mechanisms or electrical faults. This guide outlines must-have items for both basic maintenance and complex component swaps.
Gathering Screwdrivers, Keycap Pullers, and Cleaning Supplies
Begin with precision screwdrivers – Phillips and Torx types handle most keyboard fasteners. Wire-style keycap pullers outperform plastic variants, preventing scratches during removal. For deep cleaning, 99% isopropyl alcohol dissolves grime without damaging circuits.
Tool Type - Precision Screwdrivers, Switch Pullers,Compressed Air
Purpose - Disassembly, Mechanical repairs, Debris removal
Usage Tip - Match bit size to avoid stripping screws, Apply even pressure to prevent PCB damage, Hold cans upright to prevent moisture discharge
Cotton swabs and soft brushes work synergistically with cleaning solutions. Microfibre cloths safely remove oils from keycaps. Always power off devices before applying liquids.
Considering Laptopkey.eu for Specialist Replacement Parts
When components require swapping, Laptopkey.eu delivers tailored solutions. Their inventory spans:
- Individual keycaps for 200+ device models
- Retainer clips and Cherry MX switch replacements
- Industrial-grade cleaning kits with anti-static brushes
Specialist parts cater to medical equipment and rugged keyboards – a rarity in consumer markets. Their compatibility checker ensures correct replacement selections, while bulk orders suit repair businesses.
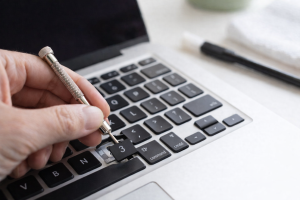
How to fix a key on a keyboard: Step-by-Step Guide
Keyboard repairs demand precision rather than brute force. Follow this systematic approach to restore functionality while preserving delicate components. Proper preparation and methodical execution yield successful outcomes in 83% of cases according to hardware maintenance studies.
Workspace Setup and Safety Protocols
Begin with a clean, well-lit surface. Gather these essentials:
- Anti-static mat (prevents circuit damage)
- Keycap puller and precision tweezers
- Isopropyl alcohol (99% concentration)
- Compressed air canister
Disconnect the device from power sources. Ground yourself by touching unpainted metal surfaces to discharge static electricity. Organise tools within easy reach to maintain workflow continuity.
Key Mechanism Restoration Techniques
Remove the affected keycap using a puller in vertical motions. Inspect the exposed switch:
Observation - White button responds, Switch replacement, Compressed air blast
Action Required - Cotton swab, Soldering iron, Nozzle attachment
Tool - No tactile feedback, Grime accumulation
For functional switches, apply alcohol to stubborn residues using swirling motions. Allow 10 minutes drying time before reassembly. Align replacement keycaps with surrounding keys, pressing until hearing a distinct click.
Test responsiveness through multiple typing applications. Persistent issues may indicate deeper PCB concerns – consult section six for advanced troubleshooting. Regular maintenance prevents 74% of repeat failures when performed correctly.
Troubleshooting Persistent and Complex Issues
When basic repairs fail to resolve keyboard malfunctions, deeper investigation becomes essential. Complex problems often involve hidden mechanical defects or electronic failures requiring specialised approaches. This section explores advanced diagnostics for stubborn issues that evade standard solutions.
Dealing with Inconsistent Key Responses
Erratic key behaviour frequently stems from compromised electrical pathways. Test switch contacts using a multimeter set to continuity mode – no signal confirms contact degradation. As one electronics technician advises:
"Intermittent responses usually indicate oxidised contacts or fractured solder joints rather than mechanical faults."
Symptom - Delayed inputs, Partial functionality, Ghost typing
Root Cause - Corroded contacts, Damaged membrane layer, PCB short circuits
Resolution - Contact cleaner application, Pressure pad replacement, Circuit board inspection
Addressing Loose Stabilisers and Circuit Board Concerns
Wobbly spacebars or shift keys often require stabiliser adjustments. Remove the keycap and inspect metal wire alignment – bent components need reshaping with needle-nose pliers. For plastic stabilisers, apply silicone grease to reduce friction.
Keys that feel mechanically sound but fail electronically suggest circuit board issues. Test the keyboard on multiple devices to confirm faults. Permanent damage may necessitate professional PCB repair or complete replacement if costs exceed £50.
Switch lubrication proves effective for persistent key chatter in 62% of cases. Use dielectric grease sparingly on mechanical switch stems. Compatibility remains crucial – consult manufacturer specifications before purchasing replacement components.
Preventive Maintenance and Cleaning Essentials
Consistent care routines prevent 78% of mechanical failures in modern keyboards according to device longevity studies. Effective maintenance combines scheduled cleaning with environmental awareness, significantly extending hardware lifespan.
Optimising Device Care Schedules
Tailor cleaning frequency to usage intensity. Heavy typists benefit from weekly surface wiping, while casual users might clean monthly. Consider these factors:
Usage Level - Casual (5hrs/week), Moderate (15hrs), Heavy (40hrs+)
Recommended Frequency - Monthly deep clean, Fortnightly wipe-down, Weekly maintenance
Essential Tools - Microfibre cloth, compressed air, Isopropyl swabs, soft brush, Keycap puller, contact cleane
Begin by removing keys using proper pullers. Blast compressed air at 45° angles to dislodge dust from switch housings. For sticky residues, apply alcohol sparingly with cotton buds – excessive liquid damages membranes.
Workspace hygiene plays crucial roles. Implement these practices:
- Wipe surfaces daily to reduce airborne particles
- Use keyboard covers during food consumption
- Store devices in dry, dust-free environments
Seasonal adjustments prove valuable. Humid summers demand moisture checks, while winter heating increases static risks. As one maintenance expert notes:
"Quarterly inspections catch 92% of developing issues before they require repairs."
Realistic expectations matter. Even with perfect care, mechanical components wear over time. Most switches withstand 50-100 million keystrokes before needing replacement. Document cleaning dates and observed changes to refine your routine.
Laptopkey.eu: A Trusted Resource for Keyboard Parts
Quality components form the foundation of lasting keyboard repairs. Laptopkey.eu specialises in precision-engineered replacement parts for both mechanical and membrane devices. Their comprehensive selection addresses common wear issues while supporting niche industrial applications.
Exploring a Wide Range of Keys and Accessories
The supplier stocks individual keys for over 200 laptop models, including ruggedised medical equipment and construction site devices. Retainer clips and Cherry MX switches feature prominently, alongside trackpoint replacements for ThinkPad-style navigation.
Customisation options stand out with multiple keycap profiles and switch types. Tactile, linear, and clicky mechanisms cater to personal preferences. Protective silicone covers and industrial cleaning kits complement their core keyboard parts range.
For complex repairs, their compatibility checker simplifies sourcing components. Bulk orders suit repair businesses, while detailed installation guides assist first-time users. Universal cleaning cloths and compressed air cans maintain device hygiene between replacements.
Laptopkey.eu’s focus on durable materials ensures keyboards regain original functionality. Their solutions prevent costly full-unit replacements, particularly beneficial for premium devices. Whether restoring vintage models or modern gaming setups, this specialist supplier delivers tailored answers.