Blog
The Laptopkey.eu blog is a place for people looking for advice and information on laptop keyboard repair. We sell individual keys, hinges, and cups, allowing for quick and economical repairs without the need to replace the entire keyboard.


How to Repair a Broken Key on a Laptop: Step-by-Step Guide
Index:
- Introduction
- Safety & Tools
- Common Key Problems
- Repair Steps Without Replacement
- Reseating Keys on Popular Laptops
- Replacing a Damaged Key
- Final Checks & Maintenance
Introduction
This guide explains how to repair a single broken laptop key — unresponsive, sticky, loose, tilted, or popped off. You will learn safe inspection, cleaning, reseating, and when a single-key replacement is needed from laptopkey.eu.
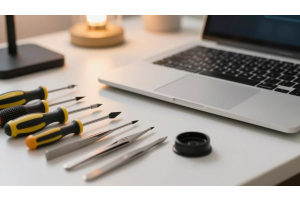
Safety & Tools
Power down, unplug and remove the battery if possible. Touch a grounded metal object before starting.
Tools: plastic prying tool, cotton swabs, toothpick, tweezers, small container.
Identify the keycap, scissor carriage and rubber pad. Take a reference photo of the layout before disassembly.

Common Key Problems
- Sticky or unresponsive key: Usually dirt or residue; cleaning often fixes.
- Popped keycap with scissor intact: Can usually snap back on.
- Loose, tilted or half-attached key: Misaligned clips or support bars; check before pressing.
- Deeper issues: Mechanism or circuitry may be damaged; replacement may be needed.
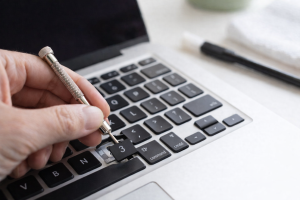
Repair Steps Without Replacement
Start with gentle cleaning using a cotton swab and minimal isopropyl alcohol. Lift the keycap at 45° with a plastic tool. Check and flatten scissor carriage, clear debris with a toothpick, then reseat the rubber pad and keycap.
| Step | Tool | Tip |
|---|---|---|
| Clean | Cotton swab | Use a small alcohol amount |
| Remove cap | Plastic pry | Lift at 45° to protect clips |
| Clear debris | Toothpick | Gently in grooves |
| Reseat & test | Hands | Press evenly until two snaps |
Reseating Keys on Popular Laptops
Align the keycap square over the scissor spring. Press straight down until two clicks — top and bottom. Wiggle slightly if corners resist. For stabilised or wide keys, attach lower rail first, then upper.
Test the key in a text field for even actuation. If it won’t click, a clip or scissor part may be damaged — consider single-key replacement.
Replacing a Damaged Key
Collect model info: brand, model, keyboard number, and photo. Exact match is essential for reliable fit and function. Order from laptopkey.eu, which provides keycap plus scissor carriage and pad if needed.
Install carriage and pad, snap keycap in place, test in a text editor. Use manufacturer guidance or photos to confirm correct fit.
Final Checks & Maintenance
- Press across key edges to verify even height and bounce.
- Type a few lines to test consistency.
- Keep keyboard clean and dry; avoid eating over it.
- Use a container for removed parts if travelling or sharing workspace.
- For recurring looseness or mis-registration, use laptopkey.eu for the correct replacement parts.